|
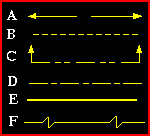
1. Identify the lines above.
|
|
|
|
A. B. C.
|
|
|
|
D. E. F.
|
|
2. The above lines are usually found on
isometric drawings.
|
|
|
|
A. True.
|
|
|
|
B. False
|
|
3. Two main types of drawings are.
|
|
|
|
A. Isometric and
Pictorial.
|
|
|
|
B. Orthographic and
Pictorial
|
|
|
|
C. Isometric and
Orthographic.
|
|
4. The dimension line usually specifies.
|
|
|
|
A. Size and location.
|
|
|
|
B. Height, length and
width .
|
|
|
|
C. Angles, lengths and
diameters.
|
|
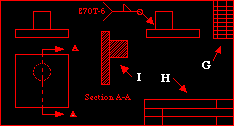
5. What welding process is to be used to make
the weld above.
|
|
|
|
A.
|
|
6. What alloy is the object made of? ( refer to
letter I above ).
|
|
|
|
A. Cast iron.
|
|
|
|
B. Copper / Brass.
|
|
|
|
C. Steel alloy.
|
|
|
|
D. Aluminum /
Magnesium.
|
|
7. Letter G above refers to.
|
|
|
|
A. The title block.
|
|
|
|
B. Reference
specifications.
|
|
|
|
C. Engineering
information.
|
|
|
|
D. Bill of materials /
parts list.
|
|
8. Letter H above refers to.
|
|
|
|
A. The title block.
|
|
|
|
B. Reference box.
|
|
|
|
C. Address box (email /
phone number )
|
|
|
|
D. QC information.
|
|
9. How is the part welded?
|
|
|
|
A. In the flat
position.
|
|
|
|
B. Fillet weld all
around.
|
|
|
|
C. Standard method.
|
|
|
|
D. Un-specified.
|
|
10. An Orthographic drawing is.
|
|
|
|
A. Two dimensional.
|
|
|
|
B. Three dimensional.
|
|
|
|
C. One dimensional.
|
|
|
|
D. All of the above.
|
www.WeldingTeacher.com


